GCP Preparation & Marketplace Launch
The following instructions outline the various aspects of launching, configuring and running jobs in CloudyCluster on Google Cloud Platform.
Overview
To use CloudyCluster you must first have a project with the necessary resources on Google Cloud Platform.
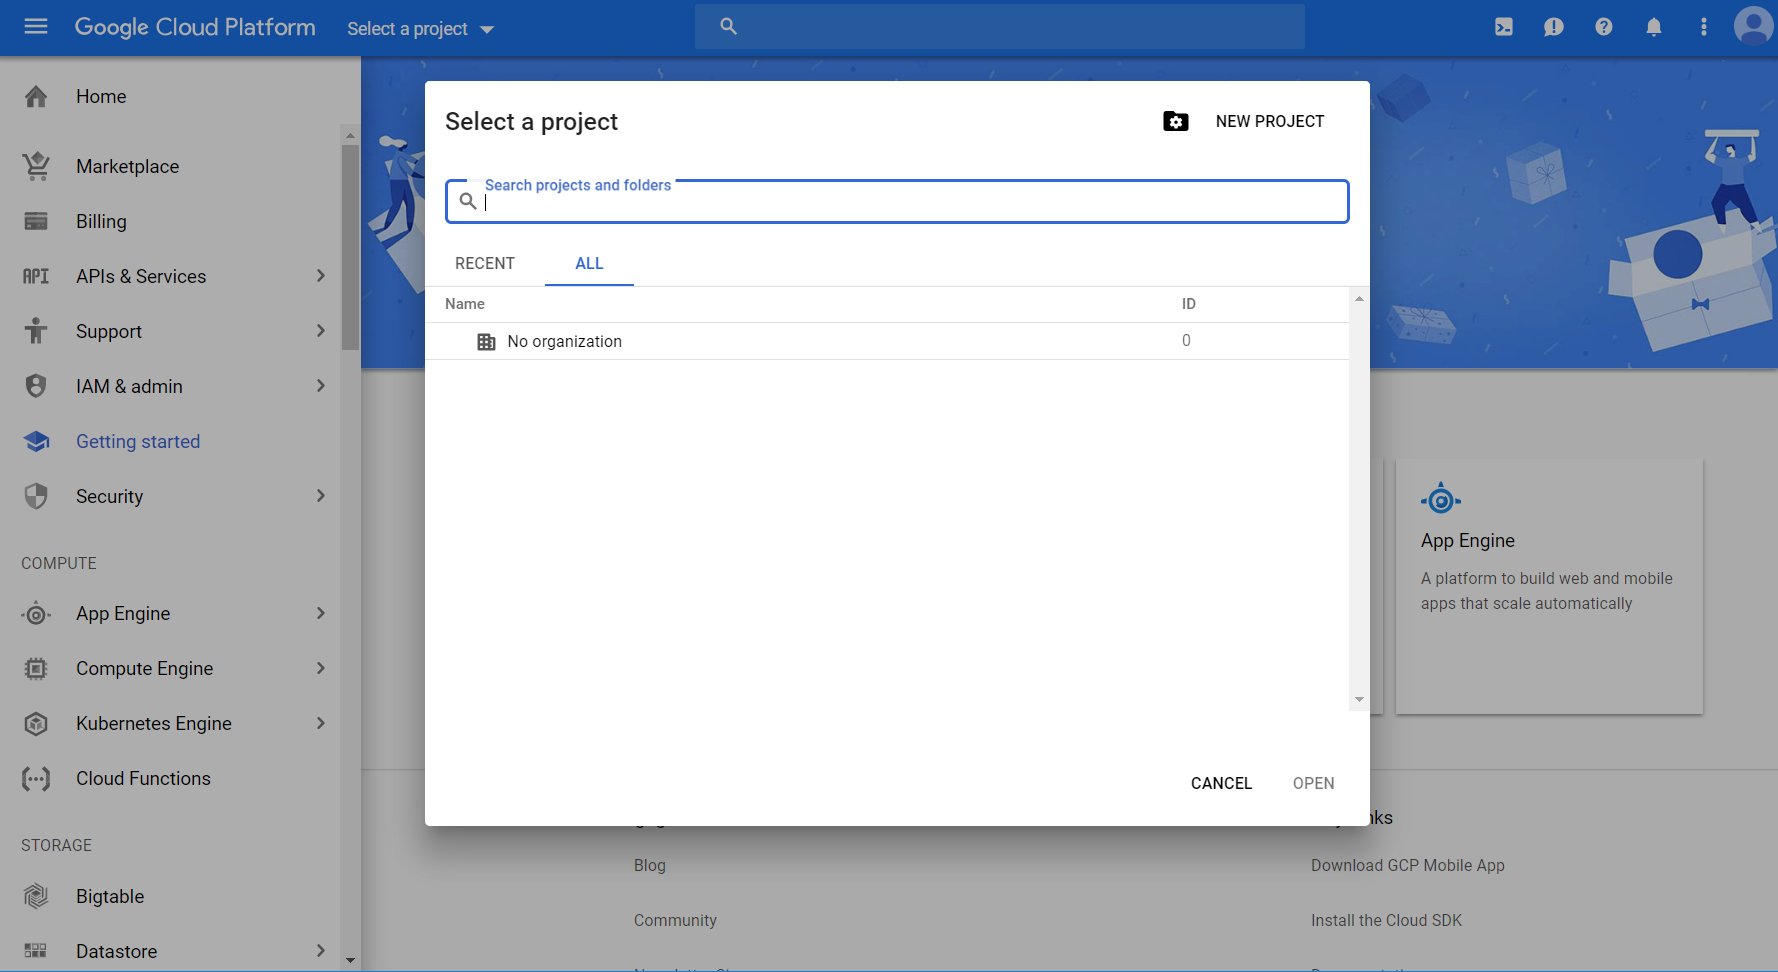
Create a GCP Project for CloudyCluster:
Check/Adjust Project Quotas
Some projects have resource limits in place, which are called quotas. These quotas must be high enough to support the cluster’s workloads. In some cases, the user must contact Google to adjust the quotas. other times, the user will be able to adjust them. Make sure to adjust the quotas for the Compute Engine API.
For more information on quotas, see the documentation.
Below is a table outlining the minimum quotas for each standard cluster size. This allows for a base cluster to be set up.
-
Size Persistent Disk SSD CPUs RAM VM Instances Test 300GB 4 16GB 4 Small 2330GB 10 40GB 5 Medium 4400GB 80 320GB 5 Large 10400GB 112 450GB 7 XL 20610GB 176 710GB 11
You will need to increase your quotas to accommodate your actual workloads as well. To run jobs, your quotas will have to be increased.
Fortunately, it is fairly simple to calculate and adjust quotas. Read our blog post on this process to learn more.
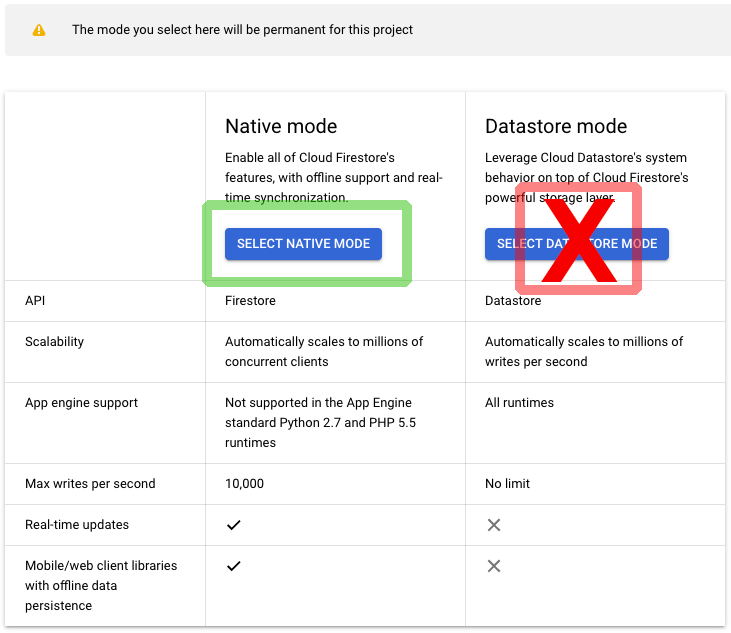
Select your project and the Native Mode for the Cloud Firestore:
In the main left-side navigation, go to Databases section or in the top search box, search for and click Firestore. Select the Native Mode for the new project.
Note: If you are using an existing project, and the mode has already been selected and is in Datastore Mode, you will need to start a new project, as this mode selection cannot be changed.
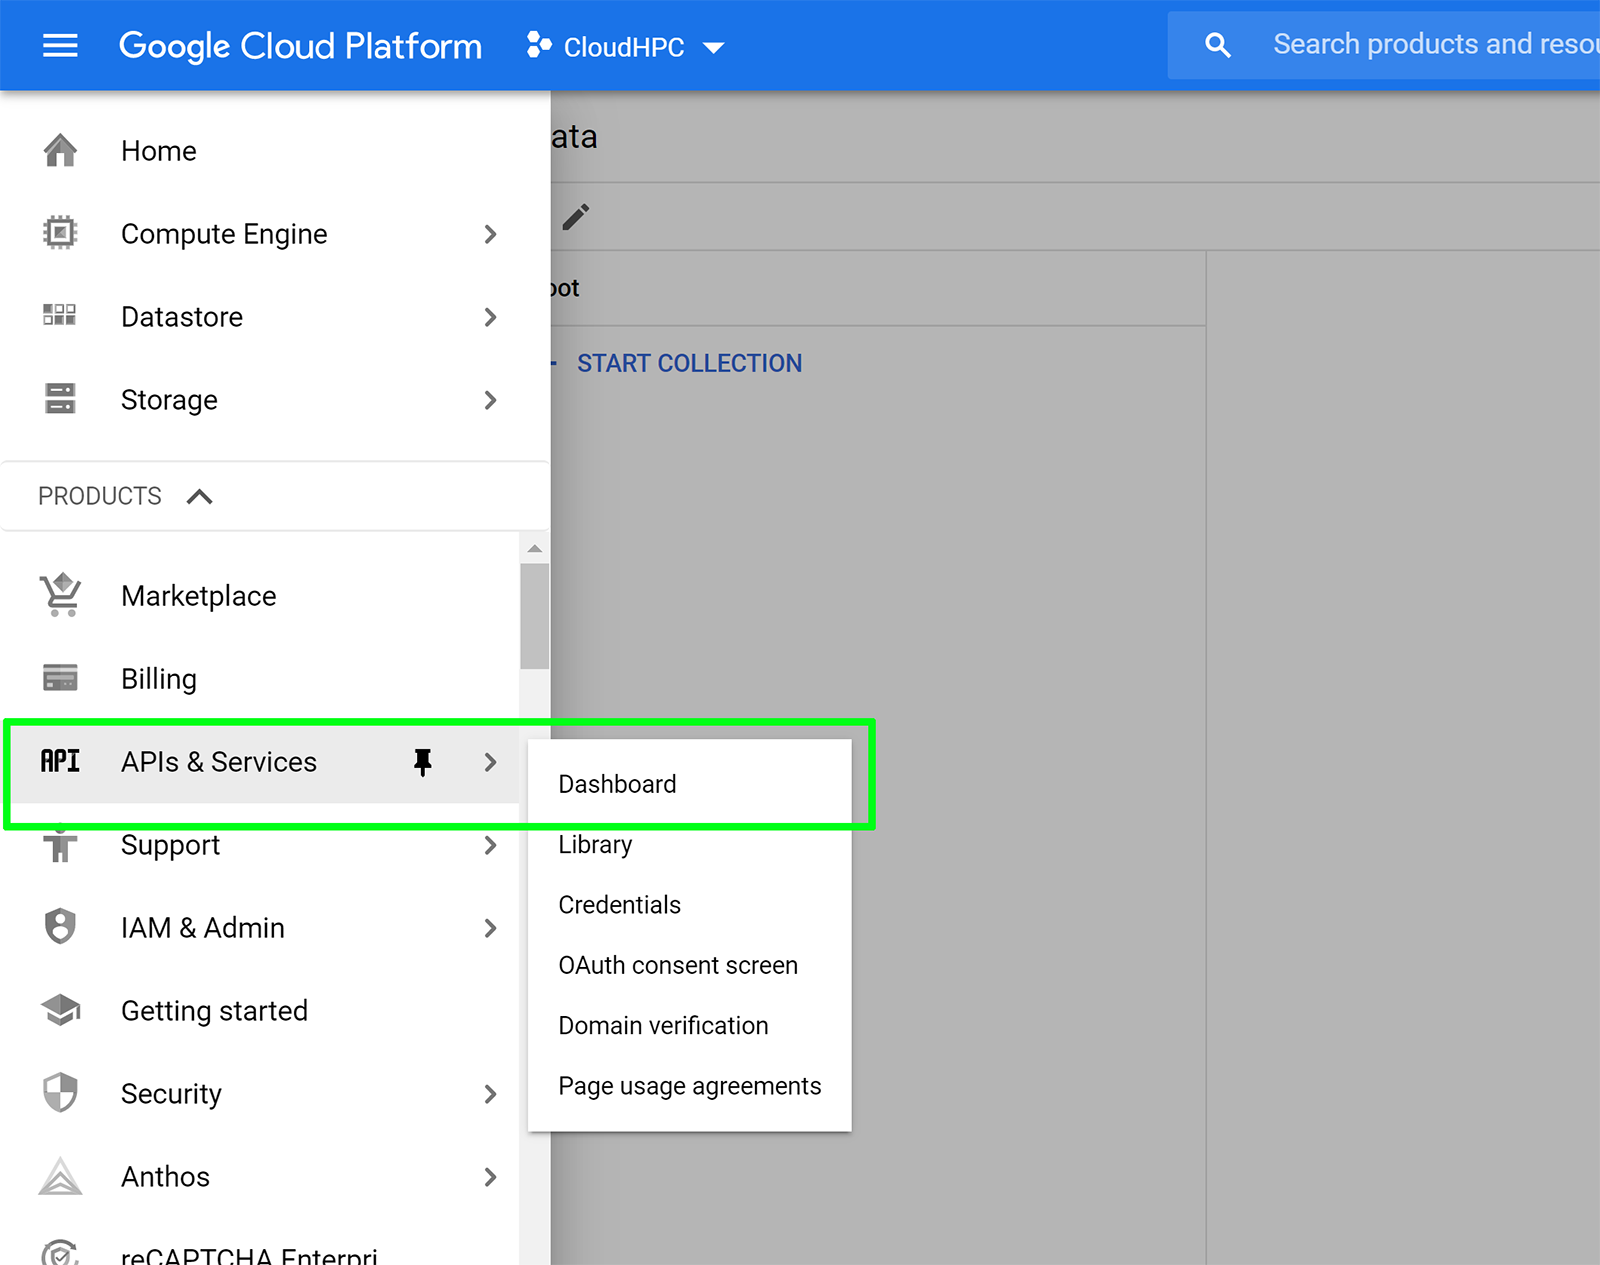
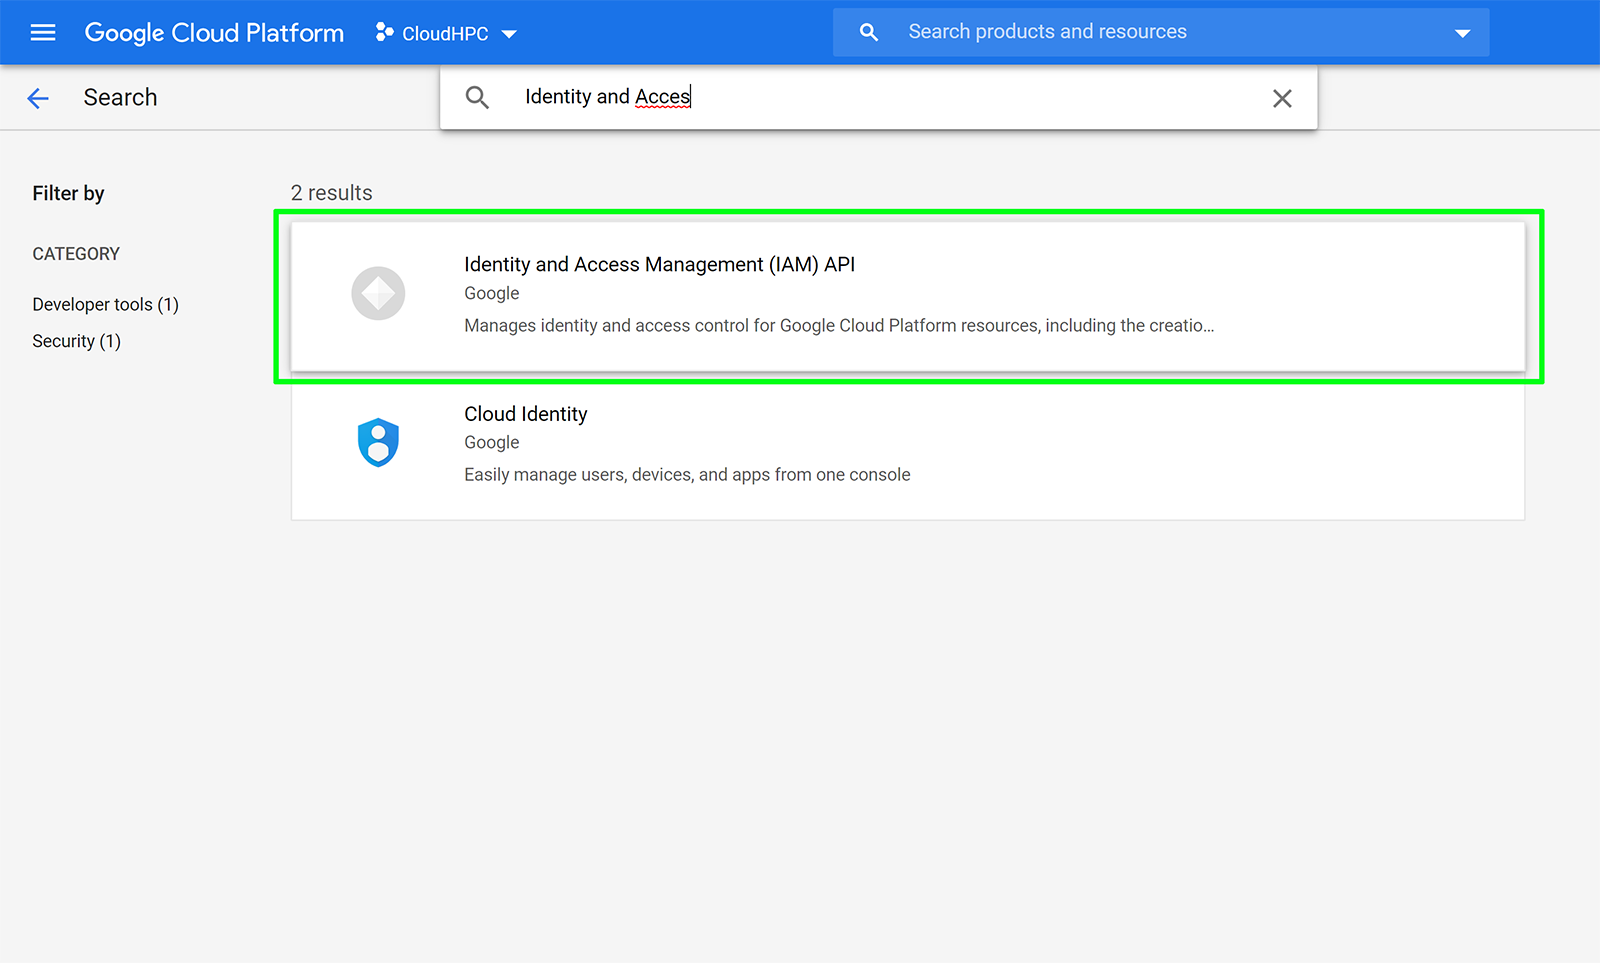
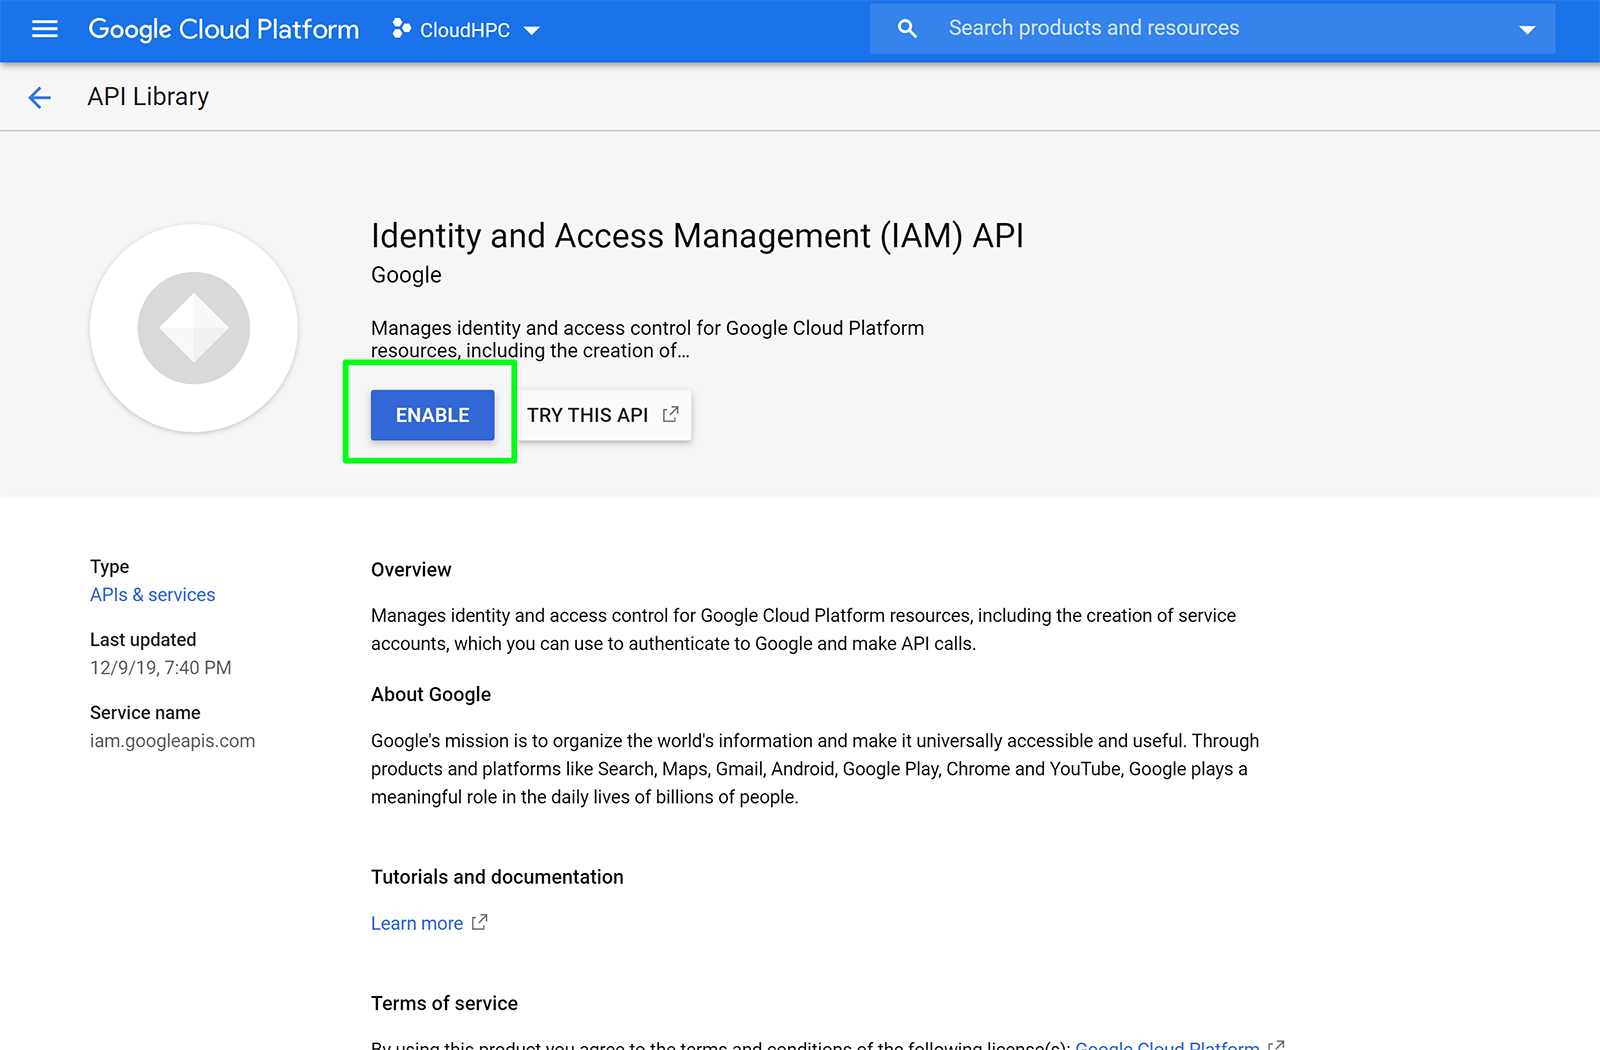
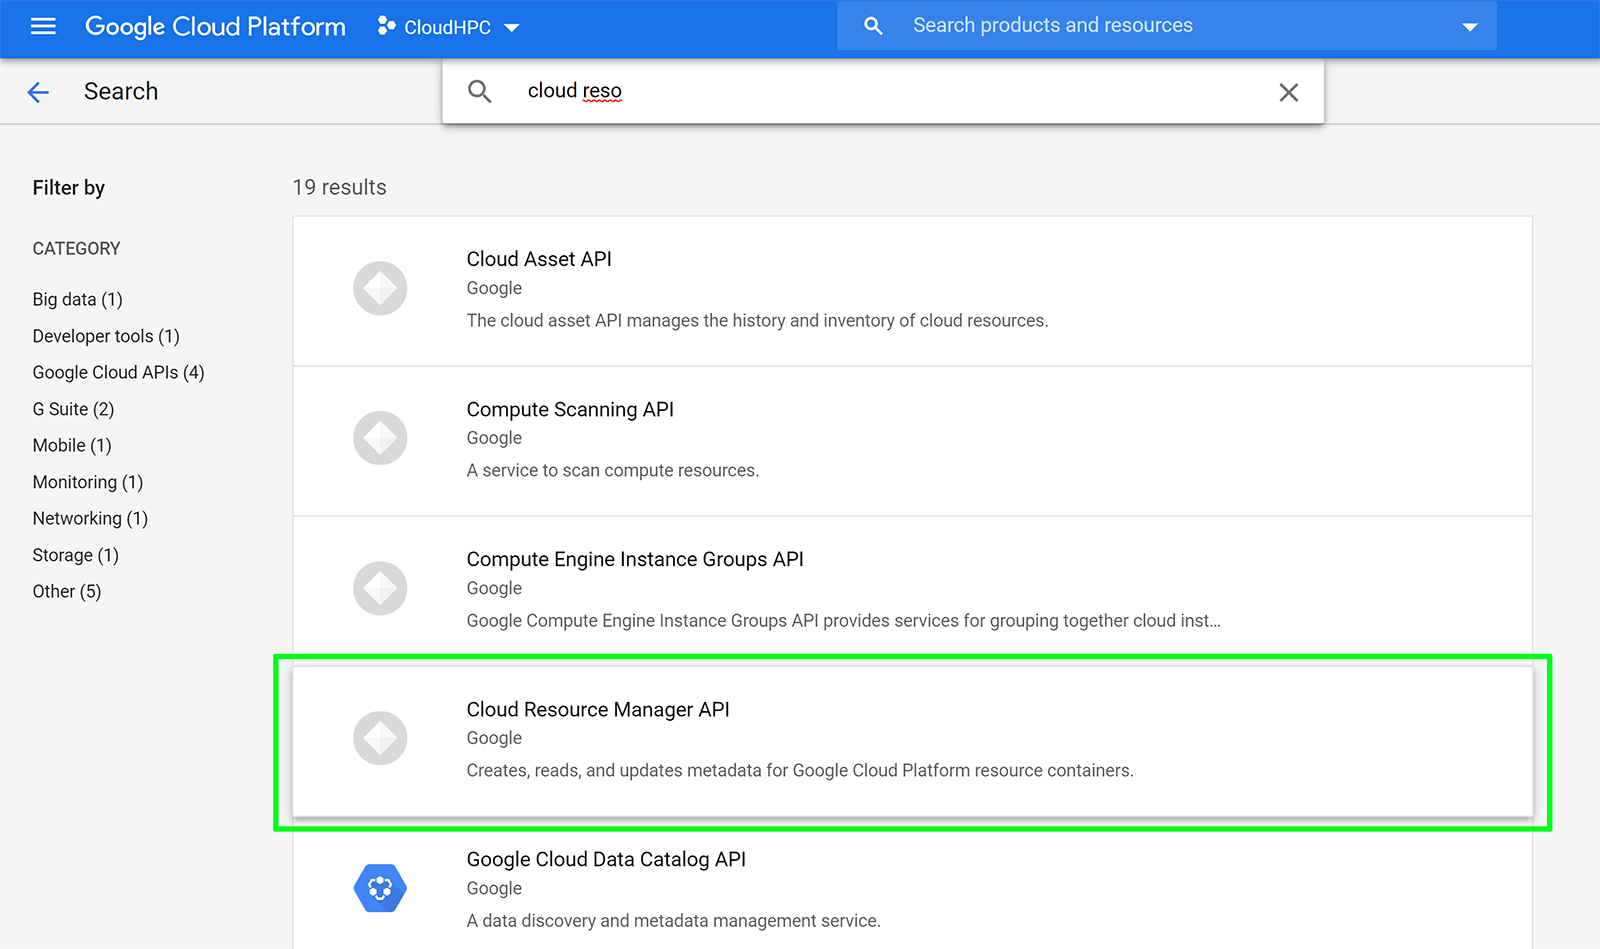
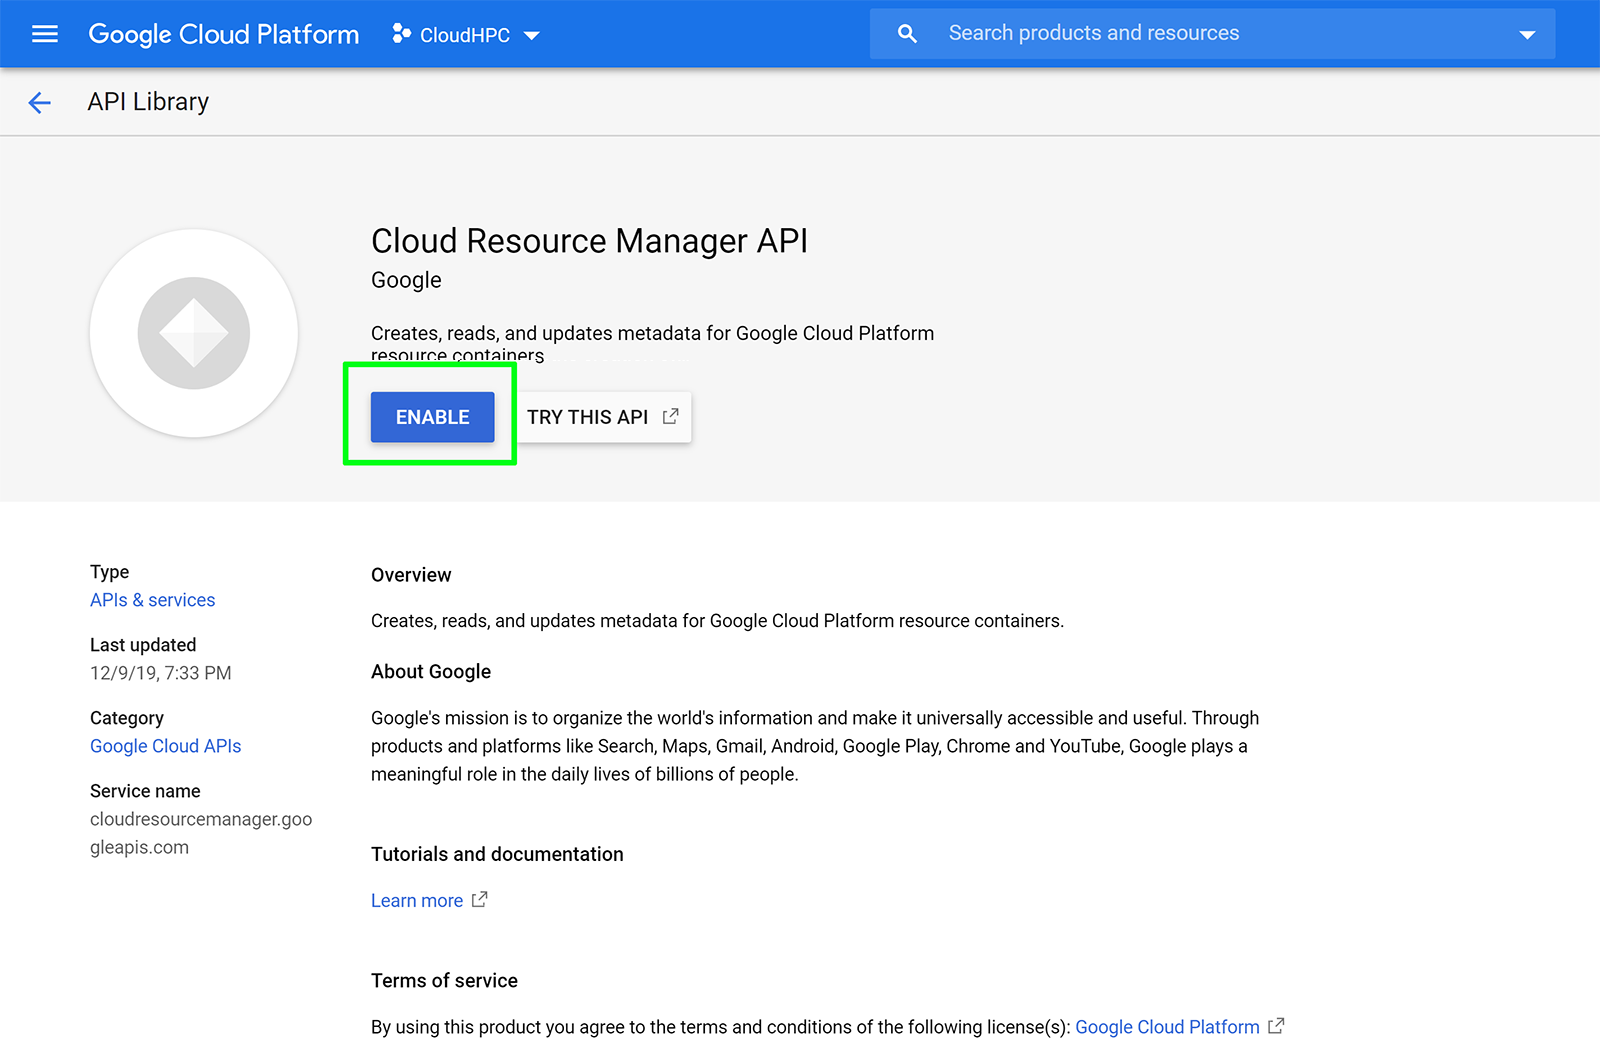
Enable IAM, Cloud Resource Manager APIs:
In the main menu, click APIs & Services
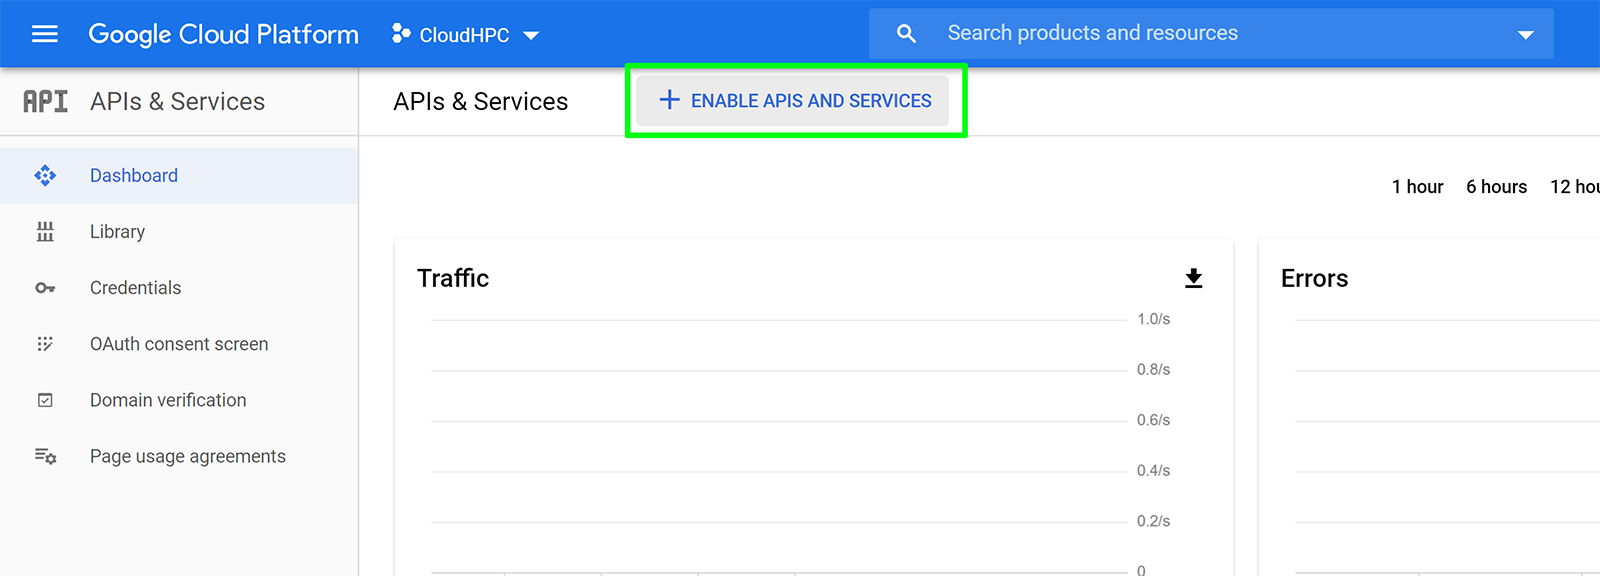
Click the Enable API button at the top of the Dashboard screen
Create a project wide SSH Key
CloudyCluster uses project wide SSH keys to provide debugging access to the instances. To configure those please refer to the Managing SSH Keys in Metadata page.
From the command prompt of Cloud Shell, type ssh-keygen -t rsa -b 2048 
user@DESKTOP-DHKOHV0:~$ ssh-keygen -t rsa -b 2048

Generating public/private rsa key pair.
Enter file in which to save the key (/home/user/.ssh/id_rsa): demo_keygen
Enter passphrase (empty for no passphrase):
Enter same passphrase again:

Your identification has been saved in demo_keygen.
Your public key has been saved in demo_keygen.pub.
The key fingerprint is:
SHA256:zYfPYxhN/TvImIUfL0lpzxaBAGThhTJ9/5ic4ejH/HY user@DESKTOP-DHKOHV0
The key's randomart image is:
+---[RSA 2048]----+
|        o=+o.0.  |
|       ooo.....  |
|        o.. o... |
|         o +.+...|
|        S +.B**..|
|           +OOB.o|
|          oo**.B |
|           o =o.E|
|            . o..|
+----[SHA256]-----+

>more demo_keygen
ssh-rsa AAAAB3NzaC1yc2EAAAADAQABAAABgQDZWtcCz9bRhGSHIt8Tt3yNxHcbO9/gWryBQXa6O2NZq3elBIgGHughWf9xgY+fBMw0uYFu981NnvrXyWhU+/0o11h7LH50Ikst6Ri3YB2W8+2r0qh1hp4bdF5SPWMAVYjBX0+kJdYGLSKBacq332jM8Ms9MAK/HvPFPjCIIlrlES3/KrocaEDm8UbI/W1vjA+ZaeAzosSrBhVBVCbx/omsN9FkAXCCJUYilpNvWGO+EdGfG8BUM9+6BbQS7DTJWQU0aGHT8MJZsLLGBMebrASLXwP9ydhsUTnYRjGxLlPZ6A8ftAylj5jOJe1qGYYvav6buvGSEsY84EioJ8JKdu8mdMizdmeXNlQ0nSbdkGmXY3Nz9ngafd/5jMAcP1b9j+454fAeo31e68zryN1ffXnVxbV0KcQ5lkiXMww7zlmeY5yyZn0A2380GLQ+ErZ2IhsdCd4U/zfyhwS43xM/oVTAyBdZ4ji1w2oJVQ21LnMrTE9ImLBC2jhUHI3Aa/t7QrE= user@DESKTOP-DHKOHV0
Now you can copy the key to the ssh keys list in the console. Copy from ssh…. to ….user (skip the @and everything after)
Create a Service Account for CloudyCluster
Modify the following script:
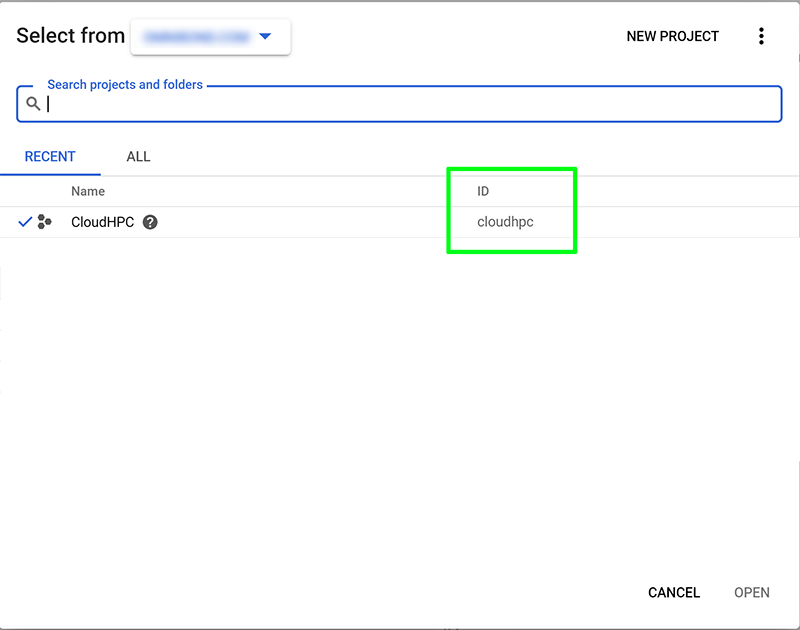
Copy the following script block into your preferred text editor. Rename <PROJECT_ID> to your GCP Cloud Project. Find the correct spelling by clicking on your Project List dropdown and use the same name (case sensitive) in the script.
- Change the <PROJECT_ID> with the project ID of the project where you want to run CloudyCluster (In this example, the PROJECT_ID = cloudhpc)
- Change the <SERVICE_ACCOUNT_NAME> with the name of the service account (without the <>) to the name you want, remember this name you will need it at launch through the marketplace. This can be any name you choose to create.
- Copy and paste, then run the updated script again in the Google Console Cloud Shell:
# Replace <PROJECT-ID> with the Project Id where you will be launching CloudyCluster
PROJECT="<PROJECT-ID>"

# Replace <SERVICE-ACCOUNT-NAME> with the name you want to use for the service account.
# Must be alphanumeric, between 6-30 characters long, and contain no capital letters or spaces.
NAME="<SERVICE-ACCOUNT-NAME>"

#############DO NOT CHANGE ANYTHING BELOW THIS COMMENT

# Create the service account
gcloud iam service-accounts create $NAME --project=$PROJECT --display-name "CloudyCluster service account"

# Add the Datastore Permissions
gcloud projects add-iam-policy-binding $PROJECT --member serviceAccount:$NAME@$PROJECT.iam.gserviceaccount.com --role roles/datastore.user

# Add the Network Admin Permissions
gcloud projects add-iam-policy-binding $PROJECT --member serviceAccount:$NAME@$PROJECT.iam.gserviceaccount.com --role roles/compute.networkAdmin

# Add the Security Admin Permissions
gcloud projects add-iam-policy-binding $PROJECT --member serviceAccount:$NAME@$PROJECT.iam.gserviceaccount.com --role roles/compute.securityAdmin

# Add the Project IAM Admin Permissions
gcloud projects add-iam-policy-binding $PROJECT --member serviceAccount:$NAME@$PROJECT.iam.gserviceaccount.com --role roles/resourcemanager.projectIamAdmin

# Add the Service Account Admin Permissions
gcloud projects add-iam-policy-binding $PROJECT --member serviceAccount:$NAME@$PROJECT.iam.gserviceaccount.com --role roles/iam.serviceAccountAdmin

# Add the Service Account User Permissions
gcloud projects add-iam-policy-binding $PROJECT --member serviceAccount:$NAME@$PROJECT.iam.gserviceaccount.com --role roles/iam.serviceAccountUser

# Add the Compute Instance Admin Permissions
gcloud projects add-iam-policy-binding $PROJECT --member serviceAccount:$NAME@$PROJECT.iam.gserviceaccount.com --role roles/compute.instanceAdmin.v1

# Add Stackdriver Permission
gcloud projects add-iam-policy-binding $PROJECT --member serviceAccount:$NAME@$PROJECT.iam.gserviceaccount.com --role roles/logging.logWriter

# Add Storage Admin Permission
gcloud projects add-iam-policy-binding $PROJECT --member serviceAccount:$NAME@$PROJECT.iam.gserviceaccount.com --role roles/storage.admin
Once the script has run, you will see output like the following and when it is completed, it will return to the command prompt:
Created service account [docdemosvcacct].
Updated IAM policy for project [cloudhpc].
bindings:
- members:
  - serviceAccount:docdemosvcacct@cloudhpc.iam.gserviceaccount.com
  role: roles/datastore.user
- members:
  - serviceAccount:cloudhpc@appspot.gserviceaccount.com
  role: roles/editor
- members:
  - serviceAccount:service-107830140437@firebase-rules.iam.gserviceaccount.com
  role: roles/firebaserules.system
- members:
  - user:demouser@omnibond.com
  role: roles/owner
etag: BwWnwJu1E-U=
version: 1
Updated IAM policy for project [cloudhpc].
bindings:
- members:
  - serviceAccount:docdemosvcacct@cloudhpc.iam.gserviceaccount.com
  role: roles/compute.networkAdmin
- members:
  - serviceAccount:docdemosvcacct@cloudhpc.iam.gserviceaccount.com
  role: roles/compute.securityAdmin
- members:
  - serviceAccount:docdemosvcacct@cloudhpc.iam.gserviceaccount.com
  role: roles/datastore.user
- members:
  - serviceAccount:cloudhpc@appspot.gserviceaccount.com
  role: roles/editor
- members:
  - serviceAccount:service-107830140437@firebase-rules.iam.gserviceaccount.com
  role: roles/firebaserules.system
- members:
  - serviceAccount:docdemosvcacct@cloudhpc.iam.gserviceaccount.com
  - members:
  - serviceAccount:docdemosvcacct@cloudhpc.iam.gserviceaccount.com
  role: roles/iam.serviceAccountAdmin
- members:
  - serviceAccount:docdemosvcacct@cloudhpc.iam.gserviceaccount.com
  role: roles/iam.serviceAccountUser
- members:
  - user:demouser@omnibond.com
  role: roles/owner
- members:
  - serviceAccount:docdemosvcacct@cloudhpc.iam.gserviceaccount.com
  role: roles/resourcemanager.projectIamAdmin
etag: BwWnwJxt8a0=
version: 1
Updated IAM policy for project [cloudhpc].
bindings:
- members:
  - serviceAccount:docdemosvcacct@cloudhpc.iam.gserviceaccount.com
  role: roles/compute.instanceAdmin.v1
- members:
  - serviceAccount:docdemosvcacct@cloudhpc.iam.gserviceaccount.com
  role: roles/compute.networkAdmin
- members:
  - serviceAccount:docdemosvcacct@cloudhpc.iam.gserviceaccount.com
  role: roles/compute.securityAdmin
- members:
  - serviceAccount:docdemosvcacct@cloudhpc.iam.gserviceaccount.com
  role: roles/datastore.user
- members:
  - serviceAccount:cloudhpc@appspot.gserviceaccount.com
  role: roles/editor
- members:
  - serviceAccount:service-107830140437@firebase-rules.iam.gserviceaccount.com
  role: roles/firebaserules.system
- members:
  - serviceAccount:docdemosvcacct@cloudhpc.iam.gserviceaccount.com
  role: roles/iam.serviceAccountAdmin
- members:
- serviceAccount:docdemosvcacct@cloudhpc.iam.gserviceaccount.com
  role: roles/iam.serviceAccountUser
- members:
  - serviceAccount:docdemosvcacct@cloudhpc.iam.gserviceaccount.com
  role: roles/logging.logWriter
- members:
  - user:demouser@omnibond.com
  role: roles/owner
- members:
  - serviceAccount:docdemosvcacct@cloudhpc.iam.gserviceaccount.com
  role: roles/resourcemanager.projectIamAdmin
- members:
  - serviceAccount:docdemosvcacct@cloudhpc.iam.gserviceaccount.com
  role: roles/storage.admin
etag: BwWnwJysM6g=
version: 1
The one-time prep work is now competed, and you can proceed to launch CloudyCluster.
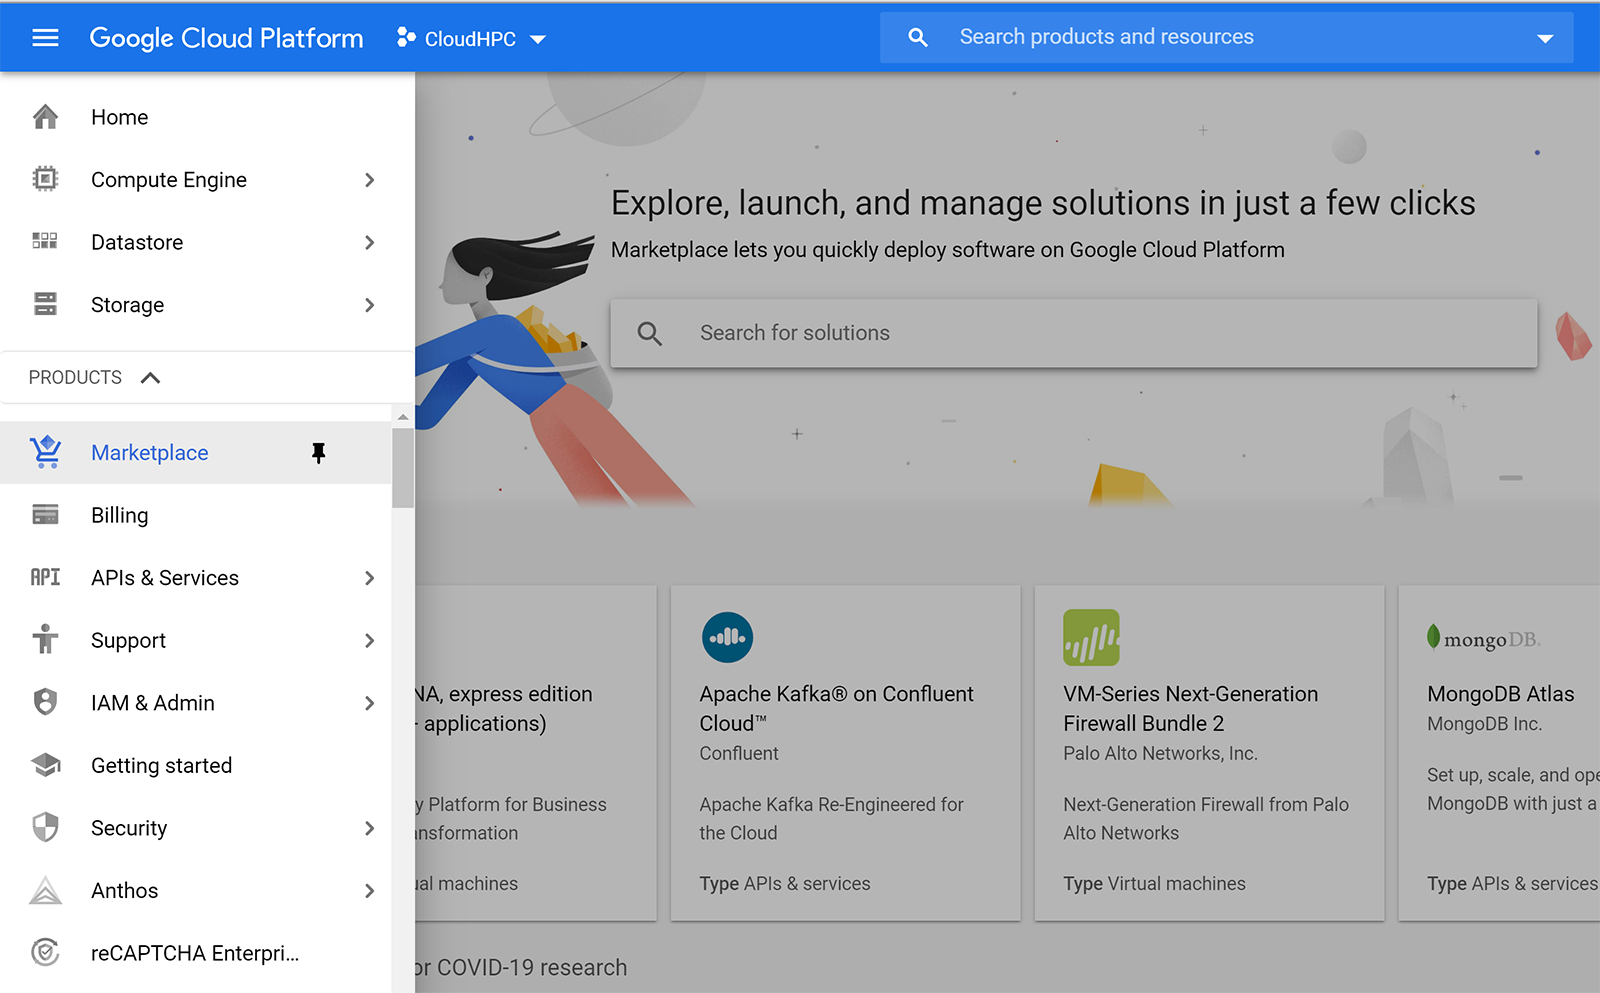
Now you can launch the Control Instance from the Marketplace
Click the Main Menu and scroll to Marketplace

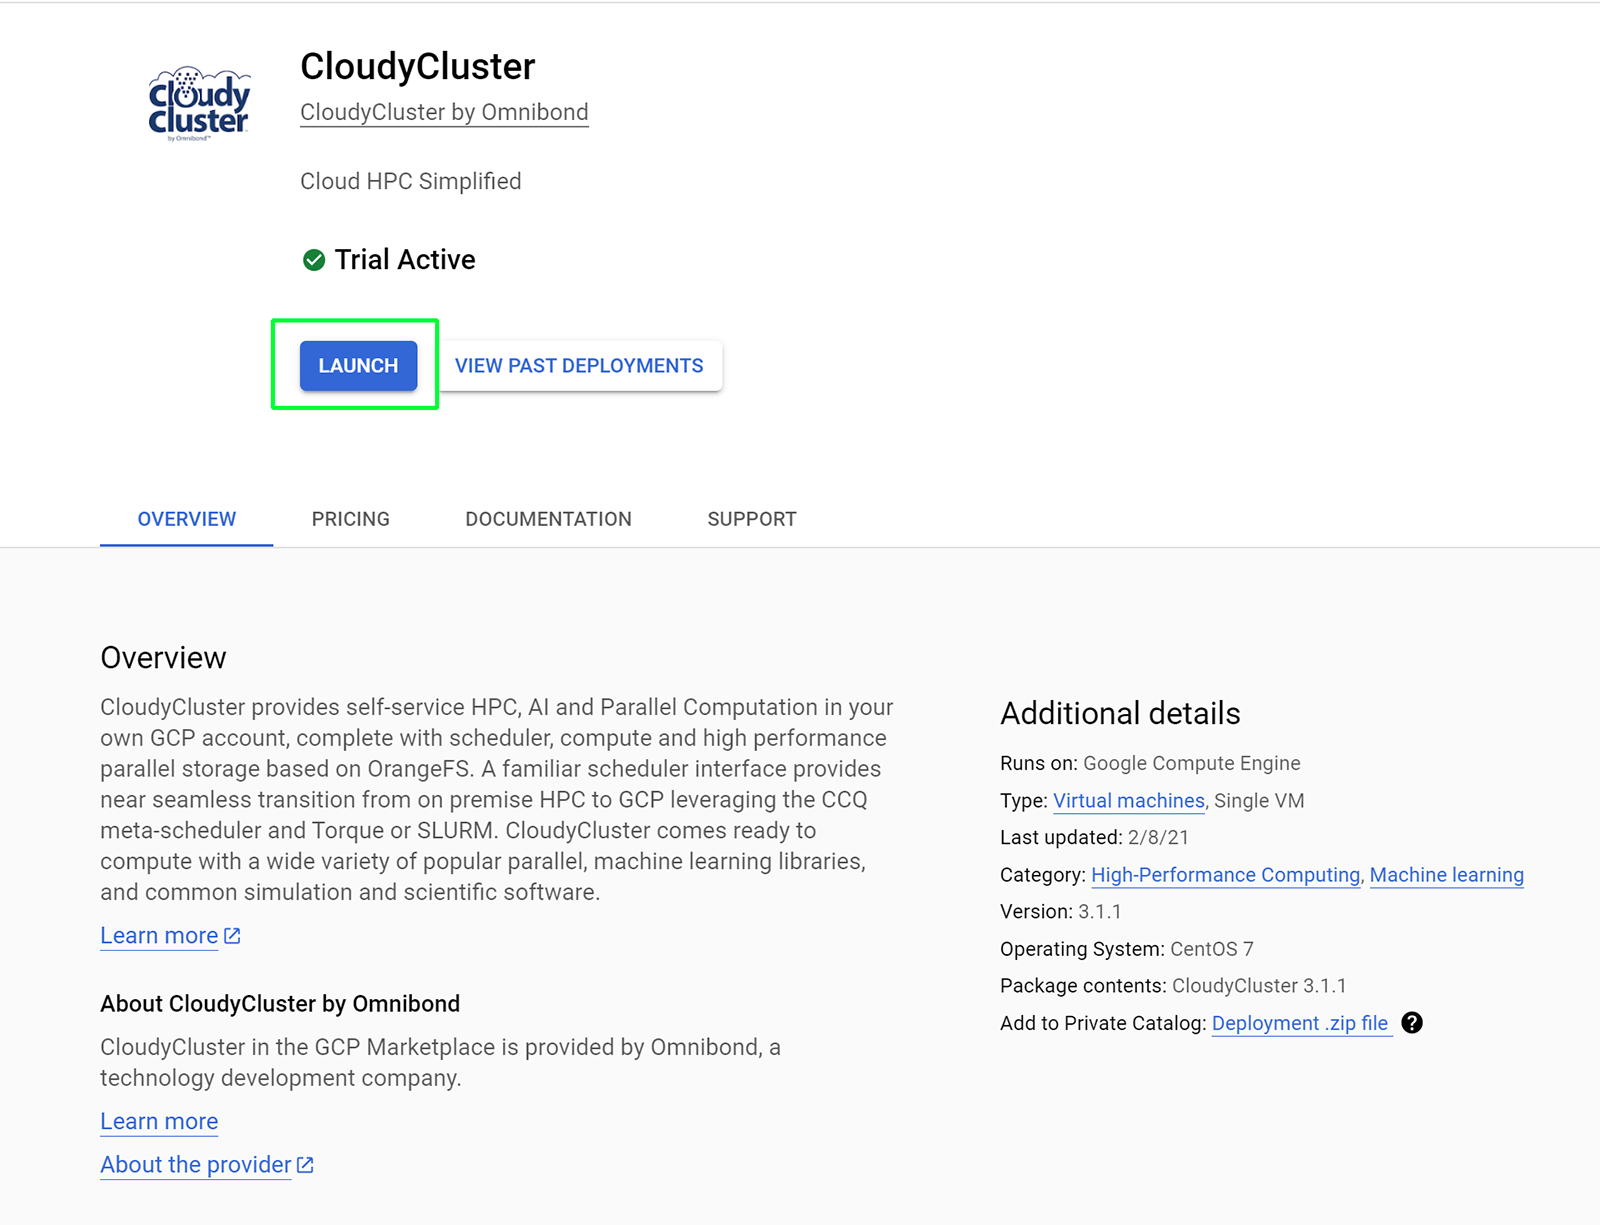
From the CloudCluster offering in the GCP Marketplace, select Launch on Compute Engine
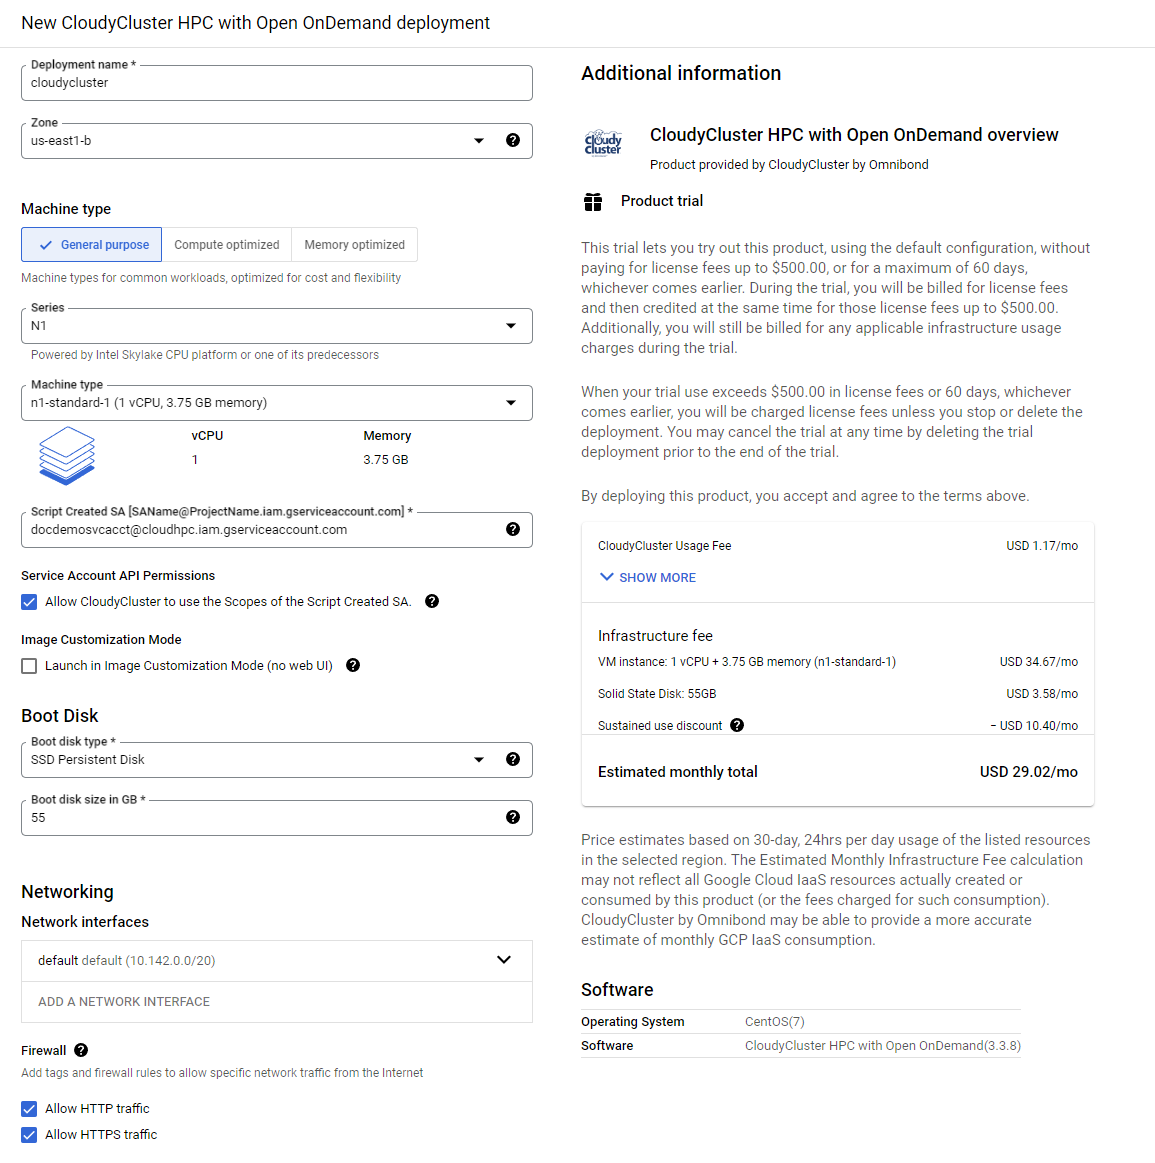
- Review and select the desired options
- Make sure you also select “Allow read write access to Google Compute Engine APIs on the VM” or CloudyCluster won’t have the required permissions to operate.
- Select Deploy
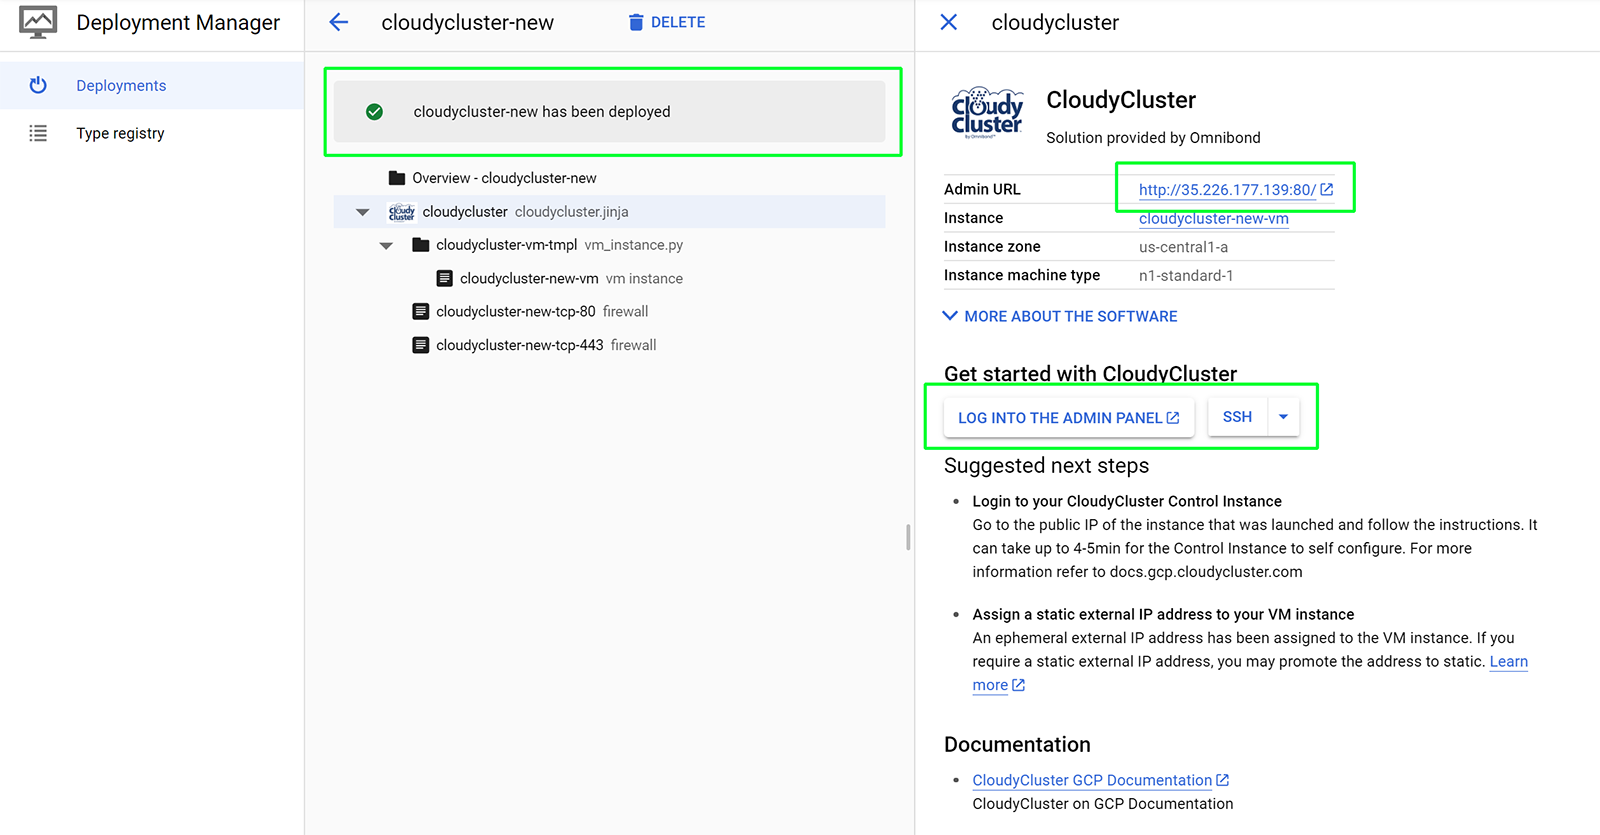
When the deployment is complete, you will see a green check mark, you will have a public IP address and buttons to access the web interface of CloudyCluster as well as directly SSH into the Control Node.
Complete configuration of your CloudyCluster environment